About Me

My photo
Henry Martin spends his nights writing fiction and poetry, which predominately deals with the often-overlooked aspects of humanity. He is the author of three novels: Escaping Barcelona, Finding Eivissa, and Eluding Reality; a short story collection, Coffee, Cigarettes, and Murderous Thoughts; and a poetry collection, The Silence Before Dawn. His most recent published project is a collection of Photostories in five volumes under the KSHM Project umbrella, for which he collaborated with Australian photographer Karl Strand, combining one of a kind images with short stories and vignettes. He is currently working on his next novel narrated in two opposing points of view. He lives with his family in the Northeast.

Saturday, November 27, 2010

Trail Riding


A few days ago, I came across a post on ADVRider mentioning a meet with fellow ADV Riders in Acton, MA. Considering the inevitably approaching winter, this seemed to be the last chance to take the bike for one last ride before the snow covers the New England roads, making travel difficult, if not impossible, for the next several months. Understandably, I was looking forward to taking a nice ride to Acton, seeing some familiar faces and meeting new ones, as well as enjoying the promised free pizza. When today finally arrived, I got my gear in order, filled the bike with gas, and was about to hit the road. And then, the phone rang.
Last week, a friend of mine and I discussed a possible woods ride. Having not heard from him in a couple of days, I assumed the ride was not about to happen, nevertheless, it was he who called: “See you in an hour,” he said.
Decision time: An hour on Rte 2 down to Acton, then some pizza, and an hour back home OR a few hours in the woods. The woods won! After all, what kind of an adventure rider would choose pizza over a real adventure.

When I arrived at the meeting place, a fire pond in Swanzey, he was already there, getting his ATV ready. Now, I have nothing against ATV, but I choose not to ride one. I find bikes more challenging, more versatile, and more enjoyable. He, on the other hand, rides only street bikes and would not venture into the woods on a bike. This, however, does not stop us from exploring the myriad of trails together.

The thermometer barely climbed to 30F and there was the impending sense of snow in the air. Unlike the last time we rode together, the trailhead was completely empty, and thus we had the whole place to ourselves. We started on a familiar trail, covering reasonable distance without much difficulty. His ATV seems to conquer any terrain anyway, while my GS with semi-street tires can be a real handful when things get rough. Yet, except a few ice-covered mud holes, the first section was easy. 

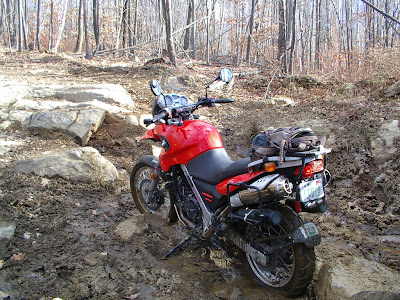
When we reached the entrance to sand dunes, we had to turn around, as the entrance is now posted as prohibited to all all-terrain vehicles. On our way back, we passed a Jeep trail where I got stuck the last time, so instead we opted to take the next trail and venture into the unknown. The GS handled reasonably well, despite the fact that the trail was muddier and much more rough. After several water crossings where the front tire acted as an icebreaker, we came to a rather steep incline. Having no way to turn around, there was only one way out – straight ahead. I tried tackling the incline, repeating to myself, “Keep the momentum going, keep the momentum going!” But the bike with the current tires has its limitations. Lets just say the Anakee is no match for mud. I got stuck a few yards from the top of the hill. 

The front tire locked in mud, between a rock and a boulder, while the rear kept spinning. I had to get off. That’s when I found out the bike was about to slide backwards down the hill, and I was not about to let that happen. Working the clutch, throttle, and brakes, I only managed to dig myself deeper, with the front fully locked. And here is where my friend’s ATV came handy. Since no amount of pushing, bouncing, or cursing freed the bike, we had to winch it up over the boulders. Too bad he was operating the winch while I kept the bike up, because that would be a one cool picture. 

Once on top of the hill, we made several more water crossings, I managed to get stuck on some submerged logs, covered my recently washed riding gear (as well as the bike) in mud, and completely depleted my energy level. And yet, just as I was thinking that I was out of the bad, we found ourselves on the very same Jeep trail where I got stuck the last time. What a joy! At that point, I was cursing all the ADV riders enjoying the warm pizza in Acton.    

Fortunately, I didn’t get stuck this time as the mud was mostly frozen over, and after a hair-raising descent, we came back to the main part of the trail, which eventually lead us back to the starting point. 

Two and a half hours after we started, muddy, cold, and exhausted, having visited places no self-respecting BMW GS should ever visit, I kicked the mud off the footpegs, kicked in the first gear, and hit the road home as the first snowflakes began to fill the air.

Thursday, November 25, 2010

KLR 250 Project: Part IX

The fork boots finally arrived yesterday, enabling me to complete the front-end reassembly. I did, however, run into some problem with the tire change: For whatever reason, the tire does not seat well in the rim, as one end sits too deep in the rim, while the opposite end sits too far out. Thus, the tire on the rim, instead of creating a perfect circle, creates sort of an oval.  I've tried inflating and deflating the tire multiple times, hoping that enough air pressure would seat it correctly, but to no avail. I then tried inflating to 5psi and bouncing the tire off the ground to seat properly, but again, to no avail. I even ran a tire spoon along the rim to loosen any grip the tire might have on the rim and bouncing/inflating again, but it continues seating just as before. So, I either have a rim that is not true, or a tire that is not round. Or, I'm an idiot who does not know how to change his own tires. I'm hoping that it is the last one.


Well, at this point I'm still waiting for the kickstart spring which has been on order for about three weeks now, as well as the front brake lever. The kickstart, however, is the crucial part, as without it I cannot reassemble the motor to see if the little kitten purrs or not. While I wait, I'll play with the wiring, or, as I like to call it: the electrical mess. There are way too many replaced wires and missing connectors, and it seems to me that the previous owner replaced whatever he needed to with one wire spool, leaving all the "fixed" pieces in a single color.  So, the next step is going to be entering the labyrinth and making it right. 

Monday, November 22, 2010

KLR 250 Project: Part VIII


KLR 250 Project: A photo-less update

A few productive days at last.

Over the weekend, in between family and chores, I was able to sneak in to the garage and put the old wrenches to some good use. First, I went through the swingarm and tightened the shock in place with blue Loctite. I then reinstalled the airbox, and bolted rear subframe in place, again with blue Loctite. Now the bike is finally starting to look like a bike. Rear fender, which was completely stripped, was reassembled, including lights and license plate mount, and broken electrical connectors for lights were replaced with bullet-type quick-disconnect ones. With all that done, the fender was mounted in the subframe. At long last, I feel like I am getting somewhere.
Tonight, having only a limited time in the garage, I decided to tackle an issue, which has been on the to-do-list since the beginning: Drain plug and front tire.

Lets begin with the tire. I bought a new Kenda 80/100 x 21 Trailmaster tire, as the front was pretty worn out. A while ago, when I started riding my G650GS in the woods, I bought two tire spoons (an 8” and an 11”), just in case. Today was time to use them for the first time. Well, the last tire I changed by hand was a bicycle tire some 25 years ago, and it was much easier. The short spoons required more “oomph” than I wanted to give it, but once enough force was applied, the tire came off its rim. Boy, am I glad I did this first in the garage and not on a trail on the rear of the BMW! That would be very interesting, fighting with a tire in the mud somewhere. Well, long story short, the Kenda is now on. The only thing that puzzles me is the fact that this tire does not have any directional arrow on its side. It appears that it can be installed either way.

The plug: The previous owner managed to strip the threads in the crankcase, and got away with the dirty fix – an expanding rubber plug. Well, I find this unacceptable, especially since, while taking clutch cover off, I discovered some of the rubber in the oil strainer. The original drain plug was a 12mm bolt. After contemplating my options, including inserts, helicoil, epoxy, larger bolt, and self-tapping plug, I chose the least invasive one (in my opinion): a ½” drain plug.
The reasons for this:
Inserts are expensive.
Epoxy may or may not leak over time.
Helicoil is not available locally in the size I need.
Self-tapping plugs exert large, unnecessary force on the crankcase, which may or may not damage the case.

Therefore, tap and bolt it came to be.

The original being a 12mm thread, stripped out, I wanted to find something close to its size, as drilling into the crankcase is not the best idea. Well, a 14mm bolt would have been too big, and 13mm bolt is virtually non-existent around here. Thus, the ½” plug came to be just about perfect. ½” is just about 12.7mm diameter, which is only .7mm larger than stock. The threads being stripped out completely, I did not need to drill at all, and using a tapered ½” tap, I was able to create nice, solid thread in the old case, without taking it apart.
On the plus side, I found a good ½”x20 plug of the right length, along with magnetic top to attract any engine shavings. Speaking of shavings, when tapping the new thread, I greased the tap with White Grease, and all the aluminum shavings stuck right in it, and came out with the tap. Of course, I’ll give the motor a good flush with fresh oil before final fill and assembly.

This brings me to my final point today:

I’m opting out of rebuilding the entire engine at this time. Initially, I was going to split the crankcase to ix the plug issue, and while at it, replace all seals and gaskets at the same time. Well, since the plug is no longer a problem, and the engine does not leak anywhere, I’m going to keep it the way it is, and see if it runs. I have the entire gasket/seal kit anyways, and may do a complete rebuild at a later date.    

Saturday, November 20, 2010

KLR 250 Project: Part VII

With the forks fully drained, I proceeded to replace the seals and fill the forks with a fresh, new oil.
Removing the old seals was fairly easy: Removed retention clip, screwed cap back on fork, and, using a bicycle pump, pumped air into the forks. It took just about 80PSI for the seal and dust cover to blow out, with a little more oil squirting all over the place. I then pried the seal completely off with a small screwdriver, taking care not to damage the fork surface. A little scrubbing with a nylon brush and a small amount of brake cleaner to get the gunk out, and it was ready for new seals.
Since I do not own a seal driver, I just pressed them in place with a small dovel, tapping on several spots to ensure proper seating. I then cleaned the dust covers, and pushed them back into place, followed by the retention clip. Repeat the whole procedure on the second fork, and I was ready for oil. I went with an anti-foaming 10W fork oil (clear). Per Kawasaki manual, (270ml on oil change, 320ml on complete disassembly), I filled the forks with 320mm each. The manual states to fill up to 190mm off top, fully compressed with no springs. I found an old spray bottle and cut the straw at 190mm, then inserted into the fork and sprayed oil out until only air came out. The 320ml overfilled the forks by about 10ml each.
Installed springs, washers, spacers, and caps. Even without any air pressure, there is a significant improvement in how the forks compress and decompress.


Second, I cleaned and lubed swingarm and reinstalled it to the frame. At first I thought the rear shock was busted and needed to be rebuilt. This, however, may not be the case. It turns out the preload was set all the way to max, which cause the spring force overcome what's left of the damping. I unscrewed the retaining rings and let decompressed the spring by about 50%. With the shock mounted back on frame, I can tell that it oes not bounce back as quickly as it did before. The shock will eventually need to be rebuilt, but for now this will get me going.

Lastly, I cleaned ballbearings on steering stem and greased them with some White Grease. The steering stem, along with triples, is back on the frame, temporarily holding the forks upright until I get my forks protectors and mount them right. 

Friday, November 19, 2010

KLR 250 Project: Part VI


There hasn’t been much progress with the KLR 250 as of late. This is due to two things: First, I’m still waiting for a crucial part – the kickstart spring; and second, it’s been just too damn cold. Even my building buddy is growing crazy-eyed when he sees the lack of progress.

The part should be here soon, or so I keep hearing from my dealer, although he has been telling me the same for two weeks. Today, I finally got the call that my spring arrived. Well, after a twenty minutes drive over there, I found out that the supplier sent a kickstand spring instead of the kickstart spring I ordered. Thus, we are back to square one on this issue.
The cold itself does not bother me, despite the fact that my garage is unheated. It, however, does bother the painting schedule. There simply isn’t any way to get a decent paint job done at temperatures hovering near 30 degrees. While I was lucky enough to get the frame and subframe done during the last two nice days we had, there wasn’t enough time to get the tank done as well. Instead of trying to heat the garage and keep it above 60 degrees, I resolved in dropping the tank off with a buddy of mine, who owns a body shop. Not only is his place heated, but he will also use decent two-part epoxy paint on the tank, which is something I could not have done myself. The color of the day? Flat black.

In the mean time, while it was still warm outside, I managed to paint the plastic parts with truck bed coating.

Initially, I was leaning towards gloss black, but the polymer coating wears better and is easier to touch up. Lets be honest here: The KLR will see about 90% dirt and 10% pavement, and thus is likely to be dropped, scratched, and molested in ways unimaginable. There will be damage, and there will be touch ups.

Lastly, I took the forks apart and drained them. Whatever the fluid in the forks used to be is unknown to me, but what came out was a very liquid emulsion of old oil and water, which explains the non-existent damping force. Right now, the forks are standing upside-down to drain all remaining fluid out.

Tomorrow, I’ll clean everything with a solvent, replace the seals, and fill them up with fresh 10W fork oil. A few pounds of air pressure and they should be as good as new. My new fork protectors should arrive next week, which should allow me to bolt everything, except the engine, back together. Once I have a rolling frame, I can start working on repairing the wiring harness.
   

Sunday, November 14, 2010

KLR 250 Project: Part V


It’s been a semi-productive, semi-frustrating weekend here, at the Project headquarters. Saturday, we had a beautiful 60-degree day – probably the last one of the season. Thus, painting was in order.
When I work on a project like this, I like to get all the cleaning, painting, and repairs done before reassembly. There is nothing worse than having bins full of parts, working on putting everything together, only to come across a piece that needs to be painted or fixed or replaced, which then stalls the entire project. No, there is a method to my madness – having all done and ready before the D-day.
Lets just say that I have learned from past mistakes, when I restored/fixed/hacked an FZ 600, and a Shadow 750.
So, where do I begin…
Working on the various painted parts, I soon came to realize why the previous owner applied the hideous camouflage paint: It was to hide all the nicks, scratches, and dents in the bodywork. Lets begin with the tank. I started sanding off the paint and discovered a blue/white/green combo factory paint underneath. Unfortunately, I also came across some rust spots and a fairly large dent in the right side of the tank. Along with a few smaller dents, this needed to be filled in. Working with a fuel tank, I did not want to use the power sander so as not to heat the metal up too much. Maybe this was an unnecessary safety precaution, but the smell of gas residue does not combine well with the close-proximity of an electric motor. Hand sanding it was. Seeing that the paint did not want to come off, I resorted to using a 60 grit paper to get to bare metal in and around the dents, to get a good “grab” surface for the fiberglass filler. Instead of a plain-old Bondo, I used a short strand reinforced body filler, which I have used in the past with good results. It provides for about 5-8 minutes working time and can be sanded in less than 30 minutes. The small dents were easy, but the large dent required two applications – first to fill the dent, and the second to contour the filler to match the tank’s curves. A couple of hours later I had it all primed and ready for paint. For a final color choice – despite the “push for green” – I went with a gloss black. There is a simple reason for this: This is what I had on hand, and the bike being a project on a budget, I have to save wherever I can. Using acrylic enamel, four coats of paint, followed by four coats of clear, were shot about 10 minutes apart. The tank is now drying, waiting for final sanding (wet-1500 grit) and buffing. This was a simple “rattle-can” paint job, but with the right prep it should last a while a weather well.
While waiting for primer to dry and so forth, I painted the frame and sub-frame with a “hammered” finish Rust-Oleum can. Of course, the frame was scuffed and primed as well. In my experience, this inexpensive paint is very durable if applied properly, and easily repaired if needed. The frame of a bike that will see a lot of off-road use is hardly the place to get fancy, so this finish is more than adequate. I’ve used this paint in the past inside fenders, and it amazed me how much abuse the cured paint can sustain without damage. This about concludes the semi-productive part.

Now onto the frustrating part:

The plastic panels were covered in the same camouflage paint, but removing it proved more complicated than with the metal tank. Sanding with 60 grit paper would kill the soft plastic, wire brushing was not an option either, and acetone would just eat the plastic away. After many unsuccessful attempts, I resorted to using a 150grit paper on a handheld power sander. Some of the paint came off easily, while the black base held on like glue. This was not expected, as the camouflage chipped without much effort. Sanding it, however, I discovered that the black was not fully cured and got sticky, clogging the paper very quickly. After many hours of fruitless labor, I was left with plastic panels that looked awful. Scratches, dings, and rough spots.
I sanded it as smooth as I could, then primed, only to discover that it needed sanding again. Now, if the previous owner would just let it be white as it used to be, I wouldn’t have all these problems. Well, after three separate coats of primer and three separate sandings, I have plastic panels that are not smooth yet, and need more primer/sanding. I, however, ran out of suitable sunlight/temperature and had to stop. By mid afternoon, it’s gotten too cool for paint to work properly.
Primed Plastic Parts

On another positive note, my new-to-me sidecover arrived Saturday night via FedEx. It was an Ebay find for $13.99, and it looks to be in a very good shape.

For now, the engine sits on top of my workbench, as I’m still waiting for the kickstart spring. Once that arrives, I’ll start taking the engine apart. 

Everything else is stacked on the side. 


Monday, November 8, 2010

KLR 250 Project: Part IV

No pictures this time around.

There hasn’t been much progress on the KLR 250 Project as of late. This is partly due to the weather, and partly due to me waiting for parts.

At the present time, the frame is all stripped, and ready for cleaning and paint preparation. I ran into some rusted threads while removing the forks from the triple tree, and now have to look for a few replacement bolts. Other than that, things went smoothly.

The bike sits in a large cardboard box, tucked in the far corner of the garage. Sometime this week, I should be receiving a new Athena complete gasket kit, which will come handy when I set to rebuild the engine. While the motor started and ran, I found some metal shavings in the oil strainer, so rather than hoping that everything is fine, I’ll take it apart and make sure. Even though the engine has only 14k miles on it, it is twenty years old, so new gaskets and seals may be in order.

Along with the gasket kit, I should be getting new fork seals – a must, since the current forks have absolutely zero dampening ability. I’m hoping that new seals along with fork oil and some compressed air will bring the forks back to life.

I took the kickstart assembly off, and discovered that the spring was, indeed, broken. A new one should be here tomorrow as well.

While this project is going to be more time-consuming that what I thought initially, there aren’t many parts that will need replacing, so the cost to value ratio should remain reasonable. Thanks to Ebay, I scored a clutch cover from a 2005 bike, for only $13.99. The original one has been welded and re-welded, so at this price, I did not have to think twice about acquiring a replacement cover. As an added bonus, I will be able to see the oil level again, as the original had a pretty messy oil window.
 
Since, once all is fixed, the bike will have to be repainted, I’m having fun contemplating different color schemes. Part of me wants to do an all-flat black, but I have to keep in mind the visibility disadvantage, especially in the woods. There has to be some bright color in there somewhere. Feel free to post color scheme recommendations here.    

Wednesday, November 3, 2010

KLR 250 Project: Part III

The bike now sits in several pieces, looking all miserable on the garage floor.


Engine removal was a breeze, especially since this is a little 250, so I could manage solo taking it out. A little wiggling and pulling and cursing, and it came out of the frame.
The most stubborn parts were the frame-through-engine bolts that had some rusted threads, and the large bolt that goes through frame, engine, and swingarm. This one had some dried grease which made it very sticky. But nothing that a 2lb rubber mallet cannot get out.
Nevertheless, some TLC with fine steel wool and a good coat of waterproof grease should make reassembly much easier. Whenever that happens.

Next I have to look at how to remove the rear shock from the swingarm to inspect it well and see if it can be rebuilt. After that, I plan on digging into the whole kickstart assembly to find what's wrong there.
At this point, I'm contemplating getting a new gasket kit and going through the entire engine. I found some questionable repairs along the way -- nothing major, just some tinkering the previous owner had done -- which makes me want to go through the whole bike to make sure it's done right.

Tuesday, November 2, 2010

KLR 250 Project: Part II

To get a better view of what I'm working with, I removed the plastics, light housing, instrument cluster and...essentially everything non-essential. The bike being naked, I was able to see a little better. After wrestling with some rusted threads on subframe bolts, the entire thing came apart without incident. The rear shock is busted -- well, it has no dampening whatsoever, so that has to come out next.

At this point, I'm working without a manual or any resource whatsoever, so I'm following my 'gut feeling' what it comes to what to tackle next. Well, since the kickstart is non-operational, I decided to head there. After looking at the motor, I discovered that the only way to get there is to remove the entire clutch cover. This, however, proved to be a slightly more complicated, as the cover would not come off. A little bit more tinkering and I found out that the cover was hanging on the water pump assembly, so the water pump had to come off as well. Is it just me or is this a really strange design? A few more bolts and a nut holding the turbine on its shaft and the cover slid off with ease.
Surprisingly, it's much cleaner there than what I thought.

No metal shavings or loose parts whatsoever, so that's the good news. I was quite surprised to find the oil filter in decent shape. Of course, it will have to be replaced.

So, looking at the kistart assembly, I'm not sure what to look for. The spring, which I initially thought to be broken since it does not return the lever up right, seems to be in one piece. Tomorrow I'll try to take the whole assembly off and figure out what's going on with it.

For now, I'm happy the clutch plates look okay with plenty of life left in them. One less thing to take apart.

Any tips or suggestions on the kickstart?